By this point, Quicksilver is a staple in the must-have applications for most OS X power users. It’s a feature packed, robust application with almost limitless potential to help you streamline your day to day computing tasks.
But even with the thousands and thousands of converts and evangelists, it’s hard to introduce someone new to Quicksilver. It’s difficult to describe, and even harder to train someone in. I learned this the hard way when I was showing the app to a fellow geek friend who, despite having heard a lot about QS, just couldn’t get her head around it.
The solution I found most effective is to latch onto a feature that based on my user sampling is woefully underused. It’s incredibly useful, so you’ll feel the effects of it immediately in your workflow. Best of all, it’s built on top of the subject-action-target model that QS is based on, so playing with it will grow your understanding of how Quicksilver works.
With that said, it’s time to fire up your copies of the [latest version](http://getqs.com/) and get ready to learn all about triggers.
*This tutorial was written using Quicksilver b47 “Rottweiler”. The application may have changed since this was written. This tutorial also assumes basic Quicksilver knowledge – if you’re new to the app, you probably want to walk through [this tutorial](https://vjarmy.com/archives/2004/03/quicksilver_a_b.php) first.*
**Important Warning**: Triggers, like most of Quicksilver, are still very much a beta feature, and should be treated as such. Parts may not work as expected; when in doubt, delete your trigger and start from scratch.
## Pushin’ Buttons
First things first: to enable triggers, you need to check the “Enable Advanced Features” button in the Application pane of the preferences. If you haven’t done this yet, now is a good time.
A lot of our time here will be spent at the Trigger preference pane. To reach it, you can simply go under the QS menu and pick Preferences, then choose Triggers. If you’re a power user and want to go even quicker, invoke Quicksilver and then press Command-‘ (single quote) to jump directly there.
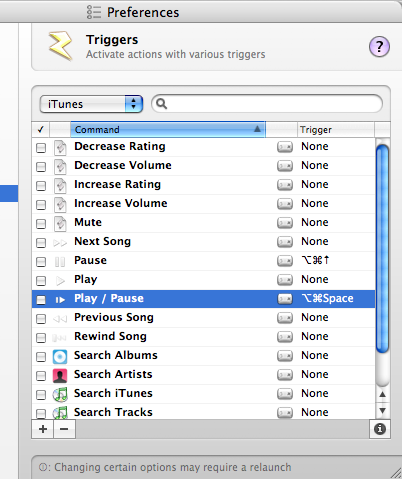
For those who spend a lot of time in the plugins pane, this will look very familiar, as it works in a similar way. Next to the search field you’ll find a pre-defined set of trigger categories. Since we’re just starting out, and Alcor has been so kind as to provide us with some pre-made triggers, choose iTunes, as I’ve done in the shot above.
You’ll see “None” next to most of these. The trigger I’ve always found most helpful is Play/Pause, to allow for quick on/off of iTunes from any app. So to make this trigger work:
– Click the checkbox next to the trigger (you won’t have to do this for ones you make yourself).
– Double click where it says None to get it to listen for the hotkey you’d like to set.
– Type whatever key combination you’d like – I recommend Control-Command-Space, but you can pick whatever you’d like.
Once that’s all done, go to some other app – hey, you’re probably in Safari or Firefox right now reading this. So press the hotkey you just set, and listen as your music either starts or stops, depending on if you were rocking out before now. Press it again, and the opposite happens. Simple, but effective.
## Let’s Push Things Forward
Now, we’re going to make a very basic trigger – one to launch an application.
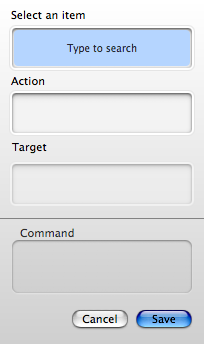
Click the + button at the bottom of the trigger window to bring up the new trigger window:
This interface should be second nature to you – it’s just the traditional QS interface in a slightly different configuration. In the “Select an item” pane, start typing whatever app you want – here I’m typing `sa` for Safari.
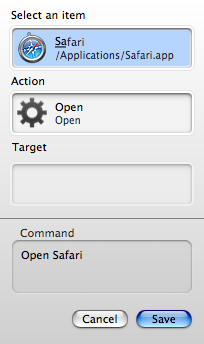
Just like the regular QS interface, it automatically chooses a default action and will show submenus to pick items if you stall for long enough. For this exercise, “Open” should suffice. Press return, and you’ll be left in the Triggers window as before, but with your new trigger selected.
Double click the None again, pick a key combination you can remember, and start using it. If the app isn’t running, the hotkey will open it. If it is running, it will switch back.
Now just think – as fast as you were launching apps with Quicksilver, this might just make you *even faster*.
## Hold It Now
Now before you go crazy assigning three-finger salutes to all your apps, there’s a small matter you need to consider: strategy. No matter how productive triggers will make you, you will get the best efficiency if you give it a little forethought and get a good layout going.
The absolute easiest spot for hotkeys are, unsurprisingly, the function keys. On desktop Macs, this isn’t really a problem, but on a laptop, Apple double assigns the function keys with volume/brightness controls. This can be inverted (so you need to hold `Fn` to use those controls) in the Keyboard & Mouse system preferences:

So, back to strategy: no one strategy will work for everyone. But good things to consider are:
– What applications do you use the most, and switch to often? Try not to assign every app under the sun, but instead only the ones you know you’re frequently accessing.
– How many function keys do you have available? Consider Exposé, Dashboard, and professional apps/games that may use them. If you don’t have enough, are there other keys you might be able to use with easy mnemonics?
– Are the function keys in blocks? If so, are there logical groups you can set up?
– Do you have multiple apps that do the same function, such as multiple web browsers? If so, you can lump them onto the same keystroke – just add an extra modifier for the secondary and tertiary apps.
– Do you have a keypad, or the block of help/insert/forward delete keys? Don’t forget these for your keystroke convenience.
– Have you stopped using Dashboard, Exposé, or Spotlight frequently? Consider unbinding the key combinations for them. Dashboard and Exposé can be unbound in the System Preference pane of the same name; Spotlight’s hotkeys can be found at the bottom of its pref pane as well.
Historically, I’ve always bound my web browser to F1, my mail client to F2, my IM client to F3, and my MP3 played to F4. Other apps on a per-machine basis go on the rest. Like I said, though – what works for one person may or may not work for you. Assign as you see fit.
## Blinded By The Lights
While we’re pausing and contemplating the best way to do things, let’s not miss the real power of the triggers. Sure, launching and switching between applications is a great time saver, but you can make a trigger out of **any single Quicksilver command**. So let your mind go wild:
– If you have a shell command you need to run frequently, you can bind that and save yourself opening the terminal and typing the command.
– If you’re frequently asked the same question and want a polite way to imply that you’re tired of it, bind `Answer Text -> Large Type` to a key and hit it the next time you’re asked. Trust me, this works.
– I always found it annoying that there’s no hotkey to jump to your downloads folder (or any other folder you’d like), but this is easily resolved using triggers. Set them up just like Apple does – heck, you can even overrule the Apple ones.
– To crib from my last tutorial: using the Search Contents action, you can create specialized Quicksilver instances just to search smaller pools. Try “iTunes -> Browse Tracks” for a subject, “Search Contents” for the action. Bind it to something similar to your existing invocation keystroke (I’m using Option-Space, since my primary is Command-Space), and voila, iTunes-specific Quicksilver queries. Way faster than switching to iTunes and messing with the search pane, and even a bit quicker than going through a basic QS query.
As is often the case with Quicksilver, the sky is the limit.
## The Mouse And The Mask
If you go trigger happy (pun somewhat intended), you may find yourself running out of keys. Luckily, there is a solution – in the Plugins pane, you’ll find a Mouse Triggers plugin. Mouse Triggers are set up the same way as keyboard triggers, except that you need to click the little keyboard icon between the name of the trigger and the hotkey and select “Mouse” instead. You then get this drawer:
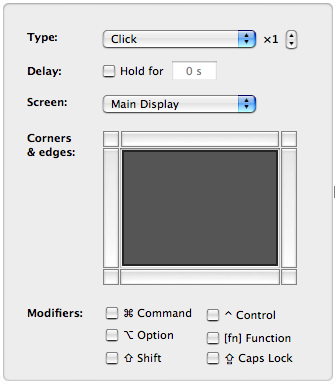
Just look at all those lovely options! You can pick any corner or side of any display you have. You can have it trigger on click (of any mouse button or quantity of clicks you desire), or enter, or exit, or drag actions. You can have to trigger with any combination of modifiers. You can set a delay. I don’t know of any more configuration options you could want for this sort of thing.
Also worth noting: some of these same options are available in a drawer for key triggers – just click the keyboard icon and select Keyboard, and the drawer will shoot out on its own.
## Funky Skunk
Warning: This last trigger hint may blow your mind. It also requires setting your Advanced Features to Beta, which will make your QS just a touch more unstable. But stability be damned, this is worth it.
Once you’ve enabled Beta mode, go to your catalog. Under Quicksilver, you’ll find two new items:
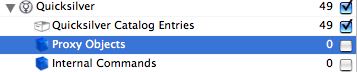
Check the Proxy Objects item, and twenty new items will be added to your catalog. When it comes to triggers, these are the twenty best items you can have. They include:
> Current Web Page, Track Now Playing, Finder Selection, Current Selection, Previous Application, Quicksilver Selection, Album Now Playing, Last Command, Network Disks, Hidden Applications, Last Object, Artist Now Playing, Current iTunes Selection, Current Playlist, Visible Applications, Selected Playlist, Mouse Trigger Dragged Object, Mounted Disks, Removable Disks, Current Application
These can all be leveraged just like you would any other object, and applied the same actions as everything else. Think about what you can do now that Quicksilver knows what’s actively going on. Not getting anything worthwhile? Okay, here are some suggestions:
– `Current Web Page -> Open With -> (your secondary web browser)` allows you to quickly switch browser when a page is broken.
– `Current Application -> Hide Others` allows you to focus just on the task at hand.
– `Network Disks -> Eject` saves you from leaving a bunch of trailing network connections at the end of the day.
– `Mouse Trigger Dragged Object -> Upload to Site -> (site object)` will allow you to drag and drop onto a part of your monitor to upload via Transmit.
– `Current Finder Selection -> Email (Compose) -> (blank)` will open Quicksilver and prompt you for an Address Book entry or email address. Once you’ve filled it in and complete the action, the selected file will automatically be attached to a new email addressed to the person you chose. (If you pick Send or Send Directly, it’ll automatically do the last bit for you.)
Mark my words: proxy objects are the single greatest things to hit Quicksilver since triggers were originally added.
## Don’t Get Lost In Heaven
If you’re still new to Quicksilver and these last few sections have frightened you, relax – there’s no need to dive all the way in to get the benefit of triggers. Start simply; set triggers to launch the apps you need, and grow from there. You’ll gradually learn how to use Quicksilver more and more, and it will be painless. Perhaps all that mumbo jumbo about proxy objects will make sense.
As always, if you need help with triggers or Quicksilver in general, try the IRC channel (#quicksilver on Freenode) or [the forums](http://forum.blacktree.com/).
*Dan Dickinson still has nothing official to do with Blacktree, he just really, really likes Quicksilver. Corrections, hate mail, and general feedback about this tutorial can be left in the comments. This tutorial is dedicated to Suw Charman and Cory Doctorow, and would not have been possible without help from J.N. Jitkoff, Richard Hu, and Paul Kehrer.*