This is an intermediate Quicksilver tutorial, to help people who went through my first tutorial and are looking for a little more in-depth information about how to tweak Quicksilver. While there are a few nifty things to do in here that are spelled out verbatim, most of this should be taken as a launching pad into your own self discovery about Quicksilver.
Before going through this article, please make sure your copy Quicksilver is up to date (including plugins), you know how to invoke the hotkey and do basic Quicksilver actions, and can find the preferences window.
This is current through b51 (3800).
You are going to rock and roll. And you can hardly wait for the music to begin. When it happens, you will become a part of that music. You are there. You are going on a musical trip. The highest, happiest trip that you’ve ever been on. Enjoy it, and get into it. Loosen your seatbelts, let’s rock and roll.
Step #1 – Tune Up Your Catalog
No application will ever meet your exact needs with the default settings – unless, of course, you’ve written it yourself, but the chances of this are slim.
The easiest way to adapt Quicksilver to your own needs, besides installing more plugins, is to customize the Catalog. The Catalog is the constraints within which Quicksilver can act – items that are in the Catalog can be searched and acted upon. But there’s a good chance there are things you don’t want in there, and I’m willing to bet there may be some things you want to have searchable that aren’t in there. You can find the Catalog in the preferences window. It looks kind of like this:
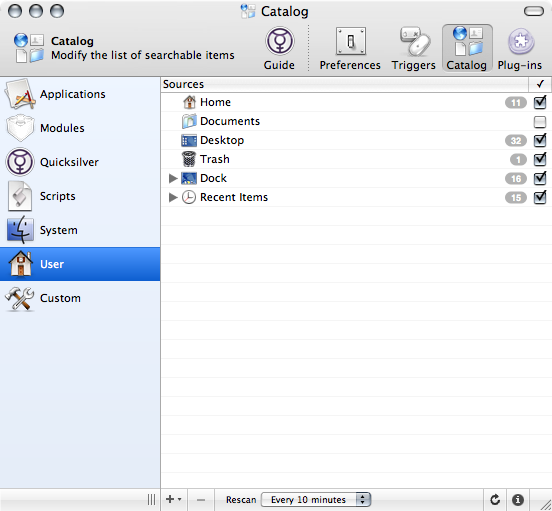
If you need to add folders to the searchable pool, that’s plenty easy; click the + button in the lower left, pick “File and Folder Scanner”, and pick the folder you want. The sidebar will pop open and give you some source options. If this is a folder, change “Include Contents” to the “Folder Contents” option, and pick an appropriate depth. Be careful – if your depth is too large, you’ll get a lot of cruft you may not want. You can see what this scanner is picking up by changing the popup in the upper right of the sidebar from “Source Options” to “Contents”. (You may need to force a rescan of the folder to see anything when you make changes – the circular arrow button in the lower right is your friend.)
If, on the other hand, you need to trim down the pool, there’s a couple of options available:
- If you know there’s a particular source you want to disable (example: Applications (Mac OS 9) if you don’t use Classic), find it in the Catalog window and uncheck the box next to it.
- If there are some objects in a source you want to remove, pop open the sidebar, go to contents and uncheck the individual items you never want to see.
I highly recommend going through the entire sources list and disabling the things you don’t need, while enabling the ones you can see as being useful. Make a habit of doing this every few months. You may find options for plug-ins that you’ve installed that you didn’t know existed.
Step #2 – Your Own Safari Search Engine
While the Safari plug-in is great for searching your own bookmarks, it has added power for those that can’t live without a web browser open at all times. As you might’ve noticed from poking around in the catalog, there’s an option in the Safari module to add the Safari History to your catalog.
Let’s think about this: if you add the history to your bookmarks, you have a catalog with every web page you’ve found valuable (bookmarks) or at least interesting enough to visit over the last n days (history). If that’s your pool, and Quicksilver has fantastic text matching abilities, then suddenly you’ve got yourself a personal search engine.
Now granted, it doesn’t search the full text of the content of the web pages, but you’re getting a very quick title-based search of all those pages. Safari doesn’t have a built-in combined search for either bookmarks and history. Also, this sure beats the hell out of scrolling through your history sub-menus trying to find that one page you were at a few days ago.
(Almost forgot: You can also use the right arrow after selecting a web object to link surf through the pages.)
Step #3 – iTunes Notification
At work, the #1 question I get when people wander by my machine is “How do you get that window that pops up and tells you what’s playing on iTunes?!”
Very simple: Go to the preferences. Click “Monitor Recent Tracks”, and then “Display Track Notifications”. Check “Show Artwork” as well if you’ve got some, as it’s nice to have the album artwork pop up with the track name.
That’s all there is to it. If you don’t like Quicksilver’s notification module, you could use Growl, a notifcation architecture that hooks into many apps, including Quicksilver.
Step #4 – Limit Your Searches With Search Contents
Even after chopping down our catalog, you may find times where you want a limited search space, like a specific folder in the catalog or in your home directory. This will especially be the case if you have a lot of gigantic and/or deep folders, or if you took my advice about the Safari History thing but then find you occasionally don’t want a bunch of web pages back in your search results.
If you find yourself in this situation, have no fear – the “Search Contents” action will re-invoke QuickSilver and have you just searching within the item you had previously selected. This can be used for more than just folders; since each QS catalog item (like the Safari bookmarks or history) has its own item in the Catalog, you can do searches limited to certain modules or plugins. There’s a great example of how this is useful down below in Trick #6.
Step #5 – One CLI To Another Using qs
A lot of power users got used to using the Terminal excessively from 10.0 up through 10.3, as the GUI is always “slow” and there wasn’t anything quite as nice as Quicksilver out yet.
If you’re one of the people still stuck in Terminal.app land, but you keep meaning to try and use Quicksilver more, there is a solution. First, make sure the Command Line Tool plugin is installed. (Please note: This is *not* the same as the Terminal Module.) Then go to the preferences, and check the Command Line Tool preference pane. Make sure you install it, of course.
At this point, I shouldn’t have to explain the rest, but just in case: you can shove ANYTHING into Quicksilver if you pipe it into the qs command. Or you can just qs file to have it pop into the command window. Or, you can add it to the shelf if you add a -s flag to QuickSilver.
Step #6 – Trigger Happy
Triggers seem very simple on the surface: after all, it’s just a hotkey system. Everyone likes binding their own hotkeys, normally for launching applications or opening frequently used folders. There’s nothing wrong with this, as it’s largely what I use it for.
There’s so much raw power though, it’d be a shame to miss out on it. Any action in QS you find yourself doing repeatedly can be bound to any hotkey on your keyboard. Just a few of the possibilities:
- Get the output of any shell command or other plugin (like Weather) and display it big with the Large Type action.
- If you run an app you’re used to having freeze up a lot, make a hotkey to kill or suspend it.
- Similarly, if you have an app you need to frequently give a little extra oomph to, make a hotkey to raise it’s priority.
- Using the above-mentioned Search Contents limiter, you can create specialized Quicksilver instances just to search smaller pools. Try “iTunes -> Browse Tracks” for a trigger, “Search Contents” for the action. Bind it to something similar to your existing invocation keystroke (I’m using Option-Space, since my primary is Command-Space), and voila, iTunes-specific Quicksilver queries. Way faster than switching to iTunes and messing with the search pane, and even a bit quicker than going through a basic QS query.
And there’s of course, one more thing: There’s a Mouse Triggers plugin available if you’re running at Beta level functionality. Any corner or side of your screen can act as a trigger. Oh yes.
Step #7 – Help The Weighting System
Every Quicksilver query you do is teaching the system a little better about what objects and actions you’re likely to use, and which ones you’re uninterested in. Everyone has false positives, though, and you may find yourself repeatedly hitting items you don’t want as they become weighted more heavily towards use with each miss.
Luckily, there’s ways to explicitly train Quicksilver; with the list full of item results open, just click on the little circle to the left of the item on the list. You can either “Make Default” (which will add 1000 to the score of the item unless you uncheck this options), or you can “Decrease Score” which will do a one-time reduction of 100 points.
Use these two options to fine tune your searching experience, as there’s nothing worse than throwing things on the Shelf over and over when you’re expecting other actions.
Step #8 – Shift Can Be Better Than Tab
There’s a very small preference stashed away in the Advanced pane, entitled “Capitalized keys modify action in command window”. This lets you effectively type into both halves of the QS window at the same time. I find it much easier to type as one long string than breaking everything up with tabs – “safariKILL” is easier than “safari (tab) kill”. Given how most people are pretty adept at hitting the shift key while they type, this may be faster for you. Give it a try.
Step #9 – Use Plugins To Leap Into Other Tools
When you inspect the plugins preferences, you’re sure to find a lengthy list of software you may know nothing about. Take advantage of this list – you know all these apps can be hooked into Quicksilver, and there’s a good chance they’re worthwhile, as people don’t tend to write plugins for useless apps. An example:
Like a lot of bloggers, I live and breathe del.icio.us, Joshua Schacter’s fantastic social bookmarks apps. It not only powers my linkblog, but it acts as a scratch pad for when I find an interesting link and want to make a note to view it later. And thanks to the del.icio.us QS plugin, all my bookmarks will immediately get pulled into my QS catalog at regular intervals.
There are tons of useful plugins abound – watch the page occasionally and see if something new strikes your fancy.
Step #10 – Explore
Quicksilver will, if you take the time to learn it and explore it, change the way you use your Mac. But the rub here is that no matter how much Blacktree, or the community, or I try to document it, there will always been some new behavior you can hack together.
Using Quicksilver is to learn from it, every single day. I’ve been using it as part of my daily routine for nearly a year now, and even while writing this, I’ve stumbled onto at least five new things, some of which I didn’t even have the room to cover in the main section here (there’s an action for “Launch Another Copy” – dual instances of apps without making a copy!). There’s this pure joy to be had in finding new shortcuts and techniques every day, and I think it’s this joy that has everyone in the Macintosh world so in love with this little app.
I realize this sort of application isn’t for everyone. Some people like strict documentation about what can and can’t be done with their apps. It can be frustrating to figure out why QS is doing what it’s doing. If you find yourself being rubbed the wrong way, take a step back and relax. Don’t expect Quicksilver to supplant everything you’re used to doing in the Finder. A better stance to take is that it can enhance what you do on a daily basis.
And as always, read the forums, join the IRC channel, and if you find a fantastic way to use QS, share it with the world.
This article would not have been possible without the ever-growing Quicksilver community, particularly Merlin Mann’s excellent 43 Folders. Thanks to Eridius for some corrections. Feedback is welcome via comment, trackback, IRC, IM, or email; you can reach me at remydwd at Google’s email service.